


Understanding the Shakti Processor
- Shakti is an Open Source processor development program based on RISC-V ISA. There are many classes of processors in the Shakti ecosystem with varying compute capabilities. For this challenge, IIT Madras has made available two variants of Shakti, namely C-Class Yamuna - 32 bit varient and Ganga - 64 bit varient . Participants can learn more about RISC-V architecture from riscv.org. Knowing RISC-V architecture is not mandatory for building applications using Shakti processors.
Controller Class (C-Class) Shakti Processor
- A controller class of processor, aimed at mid-range application workloads.
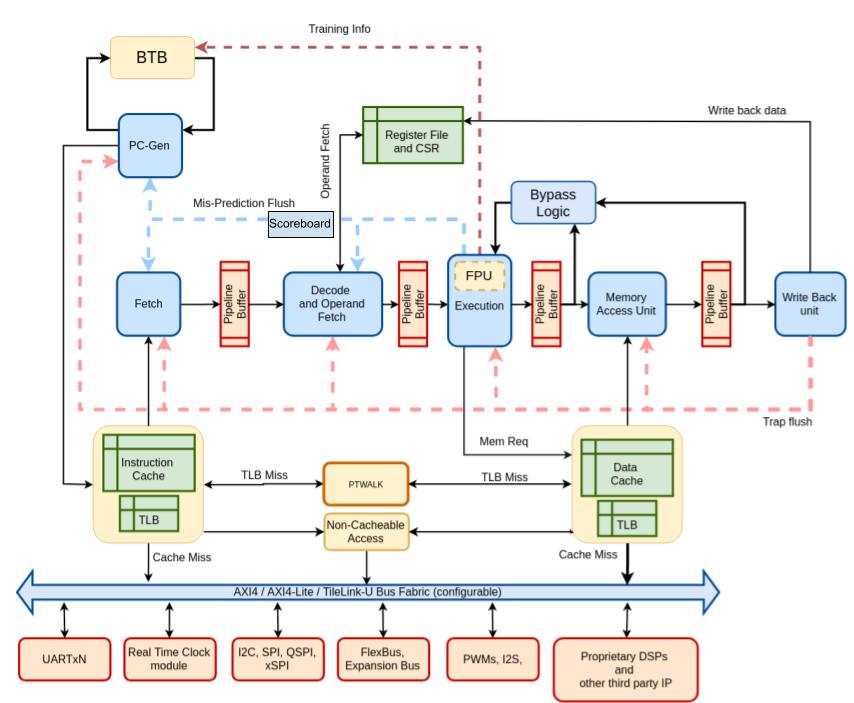
- The core is highly optimized, 6-stage in-order design with MMU support and capability to run operating systems Linux and Sel4.
- C-class targets compute/control applications in the 0.5-1.5 GHz range.
- Amongst one of the most configurable RISC-V Cores
- Supported ISA:RV[32/64]{IMAFDCS}
Shakti Ecosystem
Shakti Software Development Kit (SDK)
- The Software Development Kit (SDK) is dedicated for building application around Shakti SoC.
- A lot of sample applications integrating different sensors are demonstrated.
- The whole ecosystem is vibrant and open source.
- Shakti SDK provides all necessary scripts and board support packages to build applications. There are example programs demonstrating working of sensors.
- Related Documents can be downloaded from the 'Docs' folder inside the SDK.
WHERE DO I START?
The following steps will walk you through the procedure for building and executing an application over Shakti SoC. The SoC (Yamuna and Ganga) is supported on Artix7 100t FPGA board. FPGA board will be provided by MeitY.

Step 1: System Requirements
The recommended system requirements are as follows,
Recommended:
- Minimum 1 system with Ubuntu(22.04 Version) or Dual Boot capability
- 8 / 16 GB RAM
- 75+ GB space

Step 2: Installing Required Tools
Follow the tools setup manual to install required tools.

Step 3: IP Porting to Shakti
After Completing Step 2, Follow the document below to integrate your IP with Shakti Core
*Skip this step if your project doesnt involve IP Integration

Step 4: Develop, build and execute an Application
Follow the Shakti SDK User manual to develop , build and execute an application on Shakti SoC.
Getting to know the SoC - Yamuna and Ganga
Please select a SoC for developing your application. The features and details of each SoC is listed below.
Yamuna
A 32-bit C-class SoC on Artix7 100T board
- Features:
- C-class 6 stage In-order core
- RV32IMAC supported
- 256 MB of DDR and 8 KB of Boot ROM
- Arduino Compatible pin assignments
- Pin Mux supported
- 32 GPIOs
- 6 PWM controllers
- 4 GPT controllers
- 2 SPI controllers
- 3 UART controllers
- 2 I2C controllers
- One Interrupt controller (PLIC)
- CLINT
- On board XADC
- Onboard FTDI based Debugger
- Ethernet Lite IP from Xilinx
Ganga
A 64-bit C-class SoC on Artix7 100T board
- Features:
- C-class 6 stage In-order core
- RV64IMAC supported
- 256 MB of DDR and 8 KB of Boot ROM
- 16 GPIOs
- 2 GPT controllers
- 2 SPI controller
- 2 UART controller
- 1 I2C controller
- One Interrupt controller (PLIC)
- CLINT
- Onboard FTDI based Debugger
- Ethernet Lite IP from Xilinx
Documents & Tutorials
| Document | Description |
|---|---|
| Tools Installation Manual | This Manual will walk through installation of various required tools. |
| Shakti SoC Registers | This has complete information about the SoC and its registers. |
| RISC-V ASM Manual | A complete guide to learn ASM programming from the scratch. |
| RISC-V User Level ISA Spec | Provides the User level specifications. |
| RISC-V Privileged ISA Spec | Provides the Privileged level specifications. |
| Xilinx Licenses | A small guide to check for the Xilinx license in vivado. |
| Shakti SDK Intro | An Introduction to Shakti SDK. |
| Shakti SDK User Manual | User Manual for Using Shakti-SDK. |
| FPGA Design Flow | A guide for FPGA Design Flow. |
| Zephyr Porting on Shakti | A guide for FPGA Design Flow. |
| IP Integration Shakti SoC | Steps to port IPs for Shakti SoC |
Stuck Somewhere?
Still not Clear ?
Frequently Asked Questions
-
What should I do if I get error while loading shared libraries: libpython3.7m.so.1.0: cannot open shared object file: No such file or directory?
You may get this error while you run any RISC-V GDB. Note the python version missing, Install the respective package (Either 3.6 or 3.7).
sudo apt-get install libpython3.7-dev
-
What should I do if I get "error while loading shared libraries: libftdi1.so.2: cannot open shared object file: No such file or directory"?
You may get this error while you run any RISC-V OpenOCD. Pay attention to the package missing Here libFTDI is the missing file, so install the respective package.
libFTDI is an Open source library to communicate to FTDI chips, including the popular bitbang mode.sudo apt-get install libftdi1 libftdi1-2
-
What should I do if I get "error while loading shared libraries: libmpfr.so.4: cannot open shared object file: No such file or directory"?
You may get this error while you run any of the Shakti-tools. Create a soft link for libmpfr.
sudo ln -s /usr/lib/x86_64-linux-gnu/libmpfr.so.6 /usr/lib/x86_64-linux-gnu/libmpfr.so.4
-
What should I do if I get "miniterm.py: command not found" error?
- Download the pyserial package
- If the download fails, click here
- After downloading, follow the below commands
Note: Move into the folder into which pyserial is downloaded, then extract using tar command
tar -zxvf pyserial-2.6.tar.gz
cd pyserial-2.6
python setup.py build
sudo python setup.py install
- What should I do if I get "could not open port '/dev/ttyUSB1': [Errno 2] could not open port /dev/ttyUSB1: [Errno 2] No such file or directory: '/dev/ttyUSB1'"?
USB1 is not a valid port in this case, Press tab once to automatically get the port to which the board is connected. Press tab twice to see the available options.
- What should I do if I get an Exception while execution, For instance, Exception: mcause = 7, epc =800012ce ?
Check out our article on, how to debug when a trap occurs..